

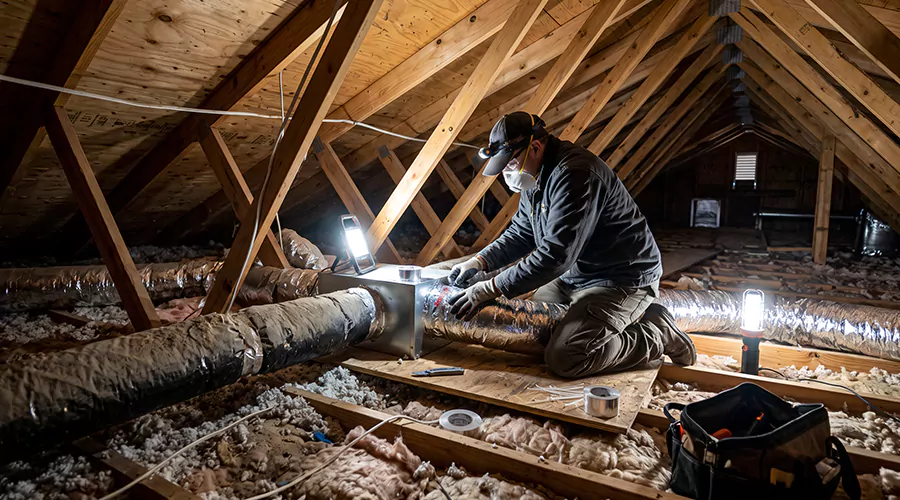
Installing ductwork in an attic involves calculating the required airflow, planning the supply and return duct routes, installing suitable trunks and branches, and securing all connections with approved fastening and sealing materials. The ducts must also be properly supported and insulated to reduce airflow restrictions and unwanted heat transfer. After installation, the system should be tested for leakage and airflow before normal heating and cooling operation begins.
Attic ductwork is common in residential heating and cooling systems, especially in single-story houses. The ducts carry conditioned air from a furnace or air handler to ceiling registers throughout the home. Some systems use rigid sheet metal trunks with flexible branches, while others contain distribution boxes connected to several insulated flexible ducts.
Installing ducts in an attic can provide convenient access to rooms without opening large sections of finished walls. However, attics often experience extreme temperature changes, making proper insulation and airtight connections particularly important. An unconditioned attic may become much hotter than the living space during summer, increasing the heat gained by poorly insulated cooling ducts. Professional air duct installation helps ensure the duct layout, insulation, and connections support efficient heating and cooling.
A successful installation requires more than placing duct materials above the ceiling. Incorrect duct sizing, loose joints, sharp bends, and inadequate support can reduce airflow even when the HVAC equipment is functioning normally. The layout and installation methods should therefore follow the home's heating and cooling design.
What Type of Ductwork Is Best for an Attic?
The most appropriate attic duct material depends on the amount of air being distributed and the available installation space. Rigid sheet metal is commonly used for main trunks because it maintains its shape and can carry air through a network of branch connections. Insulated flexible ductwork is often used for individual supply branches leading to ceiling registers.
Some systems also use fiberglass duct board or other approved duct products. These materials have different fastening, sealing, and moisture-protection requirements. A contractor should select the material based on its intended application rather than assuming that one product is suitable throughout the entire attic.
| Duct Material | Typical Attic Application | Important Installation Requirement |
|---|---|---|
| Galvanized sheet metal | Main supply and return trunks | Secure joints, hangers, and suitable insulation |
| Insulated flexible duct | Branch runs to ceiling registers | Gentle bends and wide supports |
| Fiberglass duct board | Approved plenums and distribution sections | Material-specific sealing and moisture protection |
| Rigid metal fittings | Elbows, transitions, and branch connections | Correct dimensions and airtight assembly |
| Insulated register boots | Connection to ceiling openings | Stable mounting and air sealing |
| Approved duct closure materials | Seams and fitting connections | Compatibility with the selected duct |
A combination of metal trunks and flexible branches can be practical when designed correctly. The rigid sections provide stable connections, while the flexible branches accommodate suitable changes in direction. The important factors are airflow capacity, installation quality, and protection from attic conditions.
What Should You Check Before Installing Attic Ductwork?
Before beginning installation, evaluate the attic's construction, access conditions, and existing insulation. The installer should identify roof framing, electrical wiring, plumbing, ventilation openings, and other equipment. These components affect where ducts can be routed and how they can be supported.
The heating and cooling equipment must also be suitable for the proposed distribution network. A new duct system cannot be designed accurately by choosing a diameter based only on the number of rooms. Airflow requirements should be calculated before purchasing materials.
Attic Access and Structural Safety
Attics may contain exposed joists and truss members with no continuous walking surface. Ceiling drywall is not designed to support workers or heavy equipment. Suitable access platforms and working procedures are necessary before duct materials are moved into the space.
Structural framing should not be cut or modified without an approved design. Duct routes must work around truss webs, rafters, and other load-bearing components. If the intended route conflicts with structural framing, the HVAC design should be adjusted rather than altering the structure without authorization.
Existing Attic Insulation
Attic floor insulation can affect how ducts are positioned and supported. Existing insulation may need to be moved temporarily to install register boots or seal ceiling penetrations. It should be restored appropriately after the work is completed.
Some older attics contain insulation that requires specialized assessment before disturbance. Suspected asbestos-containing materials, including certain vermiculite insulation, should not be handled during ordinary duct installation. A qualified professional should evaluate such materials before renovation work affects them.
Attic Ventilation
Vented attics rely on appropriately designed airflow through soffit, ridge, or other ventilation openings. New ducts should not block these openings or interfere with ventilation baffles. The duct layout must accommodate the attic's existing ventilation design.
Installing an HVAC duct is also different from routing bathroom exhaust or dryer exhaust. Each system has its own termination and installation requirements. A bathroom fan should not discharge moisture directly into the attic simply because HVAC ductwork is already present.
Heating and Cooling Equipment Location
The furnace or air handler location influences how the main ducts should be arranged. An attic-mounted air handler may allow relatively short supply branches. Equipment installed in a closet or lower-level utility room may require a vertical trunk reaching the attic.
The system should provide access for future maintenance. Ducts should not block equipment service panels or condensate drainage components. A technician must be able to reach important equipment without damaging the installed ductwork.
How Do You Calculate Attic Duct Sizes?
Duct sizes should be based on the amount of conditioned air required by the rooms and the available blower pressure. The design should account for the total effective length of each run, including bends, elbows, and other fittings. A duct that is too small may create excessive pressure loss and leave the connected room with weak airflow.
ACCA Manual J provides a recognized method for calculating residential heating and cooling loads. ACCA Manual D uses airflow and pressure information to develop suitable duct dimensions. These calculations are particularly important when installing an entirely new distribution system.
Flexible ductwork requires special attention because its resistance can increase when the inner liner remains compressed. Long loops and sharp turns can also restrict airflow. A duct diameter that works for a short, direct route may not perform the same way along a longer installation.
The design should include both supply and return air pathways. A system cannot distribute conditioned air properly if the blower lacks an adequate return path.
How to Install Ductwork in an Attic Step by Step?
A professional attic duct installation follows a sequence beginning with design and ending with performance checks. The exact methods vary with the duct material and HVAC equipment. The following steps describe the general process for a residential forced-air system.
Step 1. Develop the Duct Layout
Prepare a layout showing the supply trunks, branch ducts, return passages, and room register locations. The design should identify the intended dimensions and airflow for each branch. This allows the installer to determine the necessary materials before work begins.
Aim for short, direct duct routes when possible. Excessive bends and unnecessary duct length can increase resistance. The layout should also avoid roof framing and preserve attic access.
A clear plan reduces the need to improvise connections after materials have been installed.
Step 2. Select the Proper Duct Materials
Choose the duct products specified by the design, including their dimensions and insulation ratings. Flexible ducts should be compatible with the intended operating temperature and installation location. Rigid trunks should have suitable material strength and approved fittings.
The contractor should also select connection collars, mechanical fasteners, mastic, and approved closure products. The required support straps and hangers depend on duct type and size. These components should be available before installation begins.
Step 3. Confirm Permits and Installation Requirements
Local mechanical and energy codes may require permits, inspections, or duct leakage testing. Verify these requirements before installing new ducts. Insulation ratings and support arrangements should also satisfy the applicable rules and manufacturer instructions.
If ducts pass through fire-rated construction, approved penetration and restoration details may be necessary. The work should preserve required building separations rather than leave unprotected openings.
Step 4. Prepare the Attic Work Area
Establish safe access and suitable lighting before bringing materials into the attic. Identify electrical wiring, framing obstacles, and existing mechanical equipment. Where insulation must be moved to reach ceiling boots, plan for its restoration.
Attics can become dangerously hot during warm weather. Installation schedules should account for heat exposure and appropriate working conditions. Work should not proceed through unsafe access areas.
Step 5. Mark the Ceiling Register Locations
Identify the planned supply and return openings from the room layout. Check each position against attic framing, wiring, and other obstacles before creating an opening. A register location that looks suitable from inside the room may conflict with framing above it.
The selected boots and registers must match the designed airflow. Avoid relocating openings solely for convenience without checking how the change affects air distribution.
Step 6. Install the Register Boots
Secure the register boots to appropriate framing or approved supports. The boots should remain stable without relying on the connected flexible duct to carry their weight. Their connection collars must also match the selected duct dimensions.
The U.S. Department of Energy recommends sealing the perimeter where a boot meets ceiling drywall. This limits unwanted air movement between the living space and attic. The sealing material should be appropriate for the opening and surrounding construction.
Step 7. Install the Main Duct Trunks
Position the rigid supply and return trunks according to the layout. Mechanically fasten the sections and support them using hangers suitable for their dimensions and weight. The trunks should maintain the required shape without placing excessive stress on equipment connections.
Avoid unnecessary sharp transitions. Each main duct should provide the airflow required by its connected branches. Incorrectly sized trunks can limit performance throughout the system.
Where possible, position ducts so their connections remain accessible during installation and inspection.
Step 8. Install Branch Takeoff Collars
Attach the branch takeoff fittings at the approved locations along the main trunks. The fittings must be mechanically secured and appropriately sealed. Their sizes should match the branch ducts specified by the design.
A loose takeoff can leak conditioned air or separate when the branch is moved. Check each fitting before covering it with insulation or attaching the flexible duct.
Step 9. Measure and Position Flexible Duct Runs
Measure each branch along its intended route rather than leaving unnecessary material coiled in the attic. Flexible duct should be extended appropriately so the inner liner is not compressed. The route should provide gentle bends without forcing the passage against framing.
Where an abrupt change in direction is unavoidable, a suitable rigid elbow may help maintain airflow. The installer should position the branch before finalizing its connection length.
A duct with excessive slack can develop sagging and unnecessary resistance even when its diameter is correct.
Step 10. Secure the Flexible Duct Inner Liners
Move the insulation and exterior jacket back to expose the air-carrying inner liner. Attach the liner to its metal collar using an approved mechanical drawband or specified fastener. The connection should follow the manufacturer's instructions.
The inner liner must be secured directly to the collar. Attaching only the outer protective jacket does not create a reliable airtight passage. The connection should be checked before insulation is restored.
Step 11. Seal the Duct Connections
Apply compatible HVAC mastic or approved closure products to the required seams and connections. Metal trunk joints and branch takeoffs should receive suitable sealing. Flexible inner-liner connections should also be sealed according to their product instructions.
Ordinary cloth-backed duct tape is not recommended for durable HVAC duct sealing. Appropriate mechanical fastening and air sealing are separate tasks, and both are needed.
Supply leaks release conditioned air into the attic, while return leaks can draw hot or dusty attic air into the system.
Step 12. Install Flexible Duct Supports
Support flexible ducts with suitable wide straps or saddles attached to appropriate framing. Department of Energy guidance recommends horizontal support spacing of no more than four feet, with straps at least 1.5 inches wide. Sag should not exceed approximately half an inch per foot between supports.
Supports should not squeeze the insulation or inner liner. Additional supports may be needed before and after bends. A duct that leaves its connection collar and immediately turns sharply can experience significant restriction.
For vertical flexible runs, federal guidance describes support spacing no greater than six feet, subject to manufacturer requirements.
Step 13. Insulate the Ductwork
Ducts located in an unconditioned attic need insulation appropriate for local energy requirements. Many attic supply installations use R-8 insulation, but the adopted code and duct configuration determine the required specification. Rigid metal ducts may require separate insulation after sealing.
The insulation must remain continuous around connections and fittings without large gaps or unnecessary compression. Protective vapor-barrier materials should also remain intact where required. During cooling, these details help limit heat gain and condensation risks.
Step 14. Review the Attic Insulation Strategy
In certain dry-climate designs, ducts may be placed near the attic floor and covered with additional attic insulation. This arrangement can limit exposure to temperature extremes when designed correctly. However, the approach is not suitable for every attic or climate.
In humid and marine climates, buried ducts can develop condensation problems unless the approved design includes suitable protection, such as encapsulation specified by applicable Building America guidance. Homeowners should not bury ducts beneath loose insulation without evaluating climate and moisture conditions.
The attic insulation strategy should be decided during design rather than improvised after the ducts are installed.
Step 15. Install and Seal the Return Air Network
Connect the intended return grilles or return pathways to the HVAC equipment. Return duct sizing is important because the blower must receive enough air for normal operation. The contractor should check that the return layout matches the design.
Return connections must be airtight. An opening on the return side can pull unconditioned attic air into the equipment. This can contribute to unwanted temperature and particle entry.
Closed bedrooms may need dedicated or approved transfer pathways to maintain pressure balance. Those connections should be designed rather than added randomly.
Step 16. Inspect the Completed Installation
Check each duct for sharp bends, compressed areas, missing supports, loose collars, and damaged insulation. Confirm that ceiling boots are supported and that attic ventilation openings remain unobstructed. All duct connections should be restored before equipment operation.
The installer should also verify that the ductwork does not block equipment maintenance access. Inspecting the complete layout before testing can reveal problems that would otherwise remain hidden.
Step 17. Test Duct Leakage
A qualified contractor should perform the required or agreed duct leakage testing. The test helps identify openings that may not be obvious during a visual inspection. Leaking connections should be repaired while they remain accessible.
The acceptable leakage result depends on the applicable code or performance program. A newly installed duct network should not be assumed airtight simply because all its connections have been covered.
Step 18. Verify System Airflow
Restore HVAC operation after all ducts and equipment panels are secure. Measure appropriate register airflow and system static pressure to determine whether the network is performing as designed. Balancing dampers may require adjustment to distribute air correctly.
Rooms have different heating and cooling needs, so equal airflow at every register is not the objective. The finished system should deliver the intended amount of conditioned air to each space.
Should Attic Ductwork Be Suspended or Laid on the Floor?
Both approaches can be appropriate in certain installations. Suspended ducts can be routed above insulation and around framing while remaining accessible for inspection. They require proper support to avoid sagging or compression.
Attic-floor ducts may be part of a deliberately designed buried-duct strategy that reduces exposure to temperature extremes. This approach requires attention to insulation, air sealing, and climate. In humid locations, moisture risks can make an improperly buried duct system unsuitable.
The choice should follow the attic's construction and the manufacturer's requirements. Ducts should not simply be laid across framing or buried without considering airflow and condensation conditions.
What Insulation Is Required for Ductwork in an Attic?
Duct insulation requirements depend on local energy codes, duct size, and attic conditions. Many residential installations use insulated flexible duct with an R-8 rating for unconditioned attic supply runs. Other configurations may have different requirements, so the adopted local code should determine the minimum.
Insulation alone cannot correct leaky connections. Air sealing should be completed first so conditioned air does not escape through joints. A continuous exterior vapor barrier is also important where condensation protection is required.
Ducts within a properly designed conditioned attic may have different thermal requirements from ducts in a vented unconditioned attic. The contractor should identify which type of attic the home has before selecting the insulation approach.
How Long Does Attic Duct Installation Take?
A straightforward residential attic installation may take one to three working days, depending on the number of runs and the equipment arrangement. Larger homes and complicated layouts can require additional time. Work involving new ceiling openings or extensive rigid metal fabrication may take longer.
The schedule should include preparation, fastening, sealing, insulation, and performance testing. Attic heat and access restrictions can also affect how quickly installers can work safely. The contractor should provide a project-specific timetable rather than promise a fixed duration for every house.
What Mistakes Should You Avoid During Attic Duct Installation?
Installation errors can produce weak airflow and unwanted heating or cooling losses even when the duct materials are new. Attics also introduce moisture and access concerns that must be considered during planning.
Avoid these mistakes:
- Choosing duct sizes without airflow calculations.
- Blocking soffit or ridge ventilation openings.
- Walking on unsupported ceiling drywall.
- Cutting structural framing without authorization.
- Leaving flexible ducts compressed or coiled.
- Creating sharp bends near connection collars.
- Supporting ducts with narrow straps that squeeze insulation.
- Leaving gaps at register boots and trunk connections.
- Using ordinary cloth-backed tape as permanent duct sealing.
- Installing inadequate insulation in an unconditioned attic.
- Burying cooling ducts without evaluating condensation risks.
- Allowing return ducts to draw air from the attic.
- Disturbing suspected asbestos-containing insulation.
- Blocking equipment service access.
- Skipping duct leakage and airflow testing.
These mistakes can require additional work after the installation is complete. A carefully designed layout and final inspection can reduce the likelihood of hidden defects.
Can You Install Attic Ductwork Yourself?
A limited repair on a safely accessible duct may be possible for someone familiar with approved HVAC materials. Installing a new system is more complicated because duct sizing and the complete supply and return network affect equipment operation. Attic work also introduces fall hazards, heat exposure, and possible contact with older hazardous insulation.
For new duct networks or substantial modifications, a qualified HVAC contractor is recommended. Professional installation provides access to appropriate design and testing methods. The contractor should document the installed system and the results of relevant performance checks.
How Can You Maintain Attic Ductwork After Installation?
Keep stored items and other equipment from resting on flexible ducts. Heavy objects can crush the liner and reduce airflow. Attic traffic should also be controlled so supports and jackets are not damaged.
During routine HVAC maintenance, ask the technician to inspect accessible connections and insulation. Roof leaks or unexpected moisture should be corrected promptly. A damaged vapor barrier or wet insulation may require repair before the problem spreads.
Regular filter maintenance helps control particles entering the distribution network. However, keeping ducts mechanically sound and airtight is just as important as keeping the filter in suitable condition.
Conclusion
Installing ductwork in an attic requires a suitable airflow design, correctly sized materials, secure connections, proper supports, and insulation appropriate for the attic conditions. Flexible ducts should remain extended without excessive sagging or sharp bends, while rigid trunks need stable hangers and sealed joints. Attic moisture and ventilation conditions must be considered before selecting duct placement. The completed network should be tested for leakage and appropriate airflow. Have a qualified HVAC contractor design and verify substantial attic installations before the project is accepted.